Overview
This guide explains how to edit imported lessons in LingQ using the Lesson Editor on the web. You can use the LingQ Lesson Editor to update text, clean up formatting, and manage audio, video, notes and translations for your imported lessons.
When to use the lesson editor
You may need to edit imported lessons if:
- You import a lesson from YouTube with auto-generated subtitles or transcript that are poorly formatted for reading.
- You import an ebook or long article and need to clean up the text (fix paragraph breaks, removes URLs and other filler text).
- You want to update lesson details such as the title, description, cover image, or original source URL.
- You want to attach or replace audio and video, and generate or adjust timestamps.
- You want to edit sentence-level notes, translations and other metadata.
Note: Full lesson editing is only available for your own imported lessons. For other lessons in the Library, you can usually edit at the sentence level only (for example, fixing a sentence or translation).
Step 1: Open the lesson editor (web)
- Go to the language Library (for example, the French Library).
- In the Continue Studying section at the top, click the Imported Lessons tab to filter your imported content.
- Hover over the imported lesson tile you want to edit.
- Hover over the three-dot ellipsis icon on that tile.
- Click Edit Lesson to open the lesson editor.
You can also open the editor from inside an open lesson by clicking the three dots in the upper-right corner of the reader and selecting Edit Lesson.
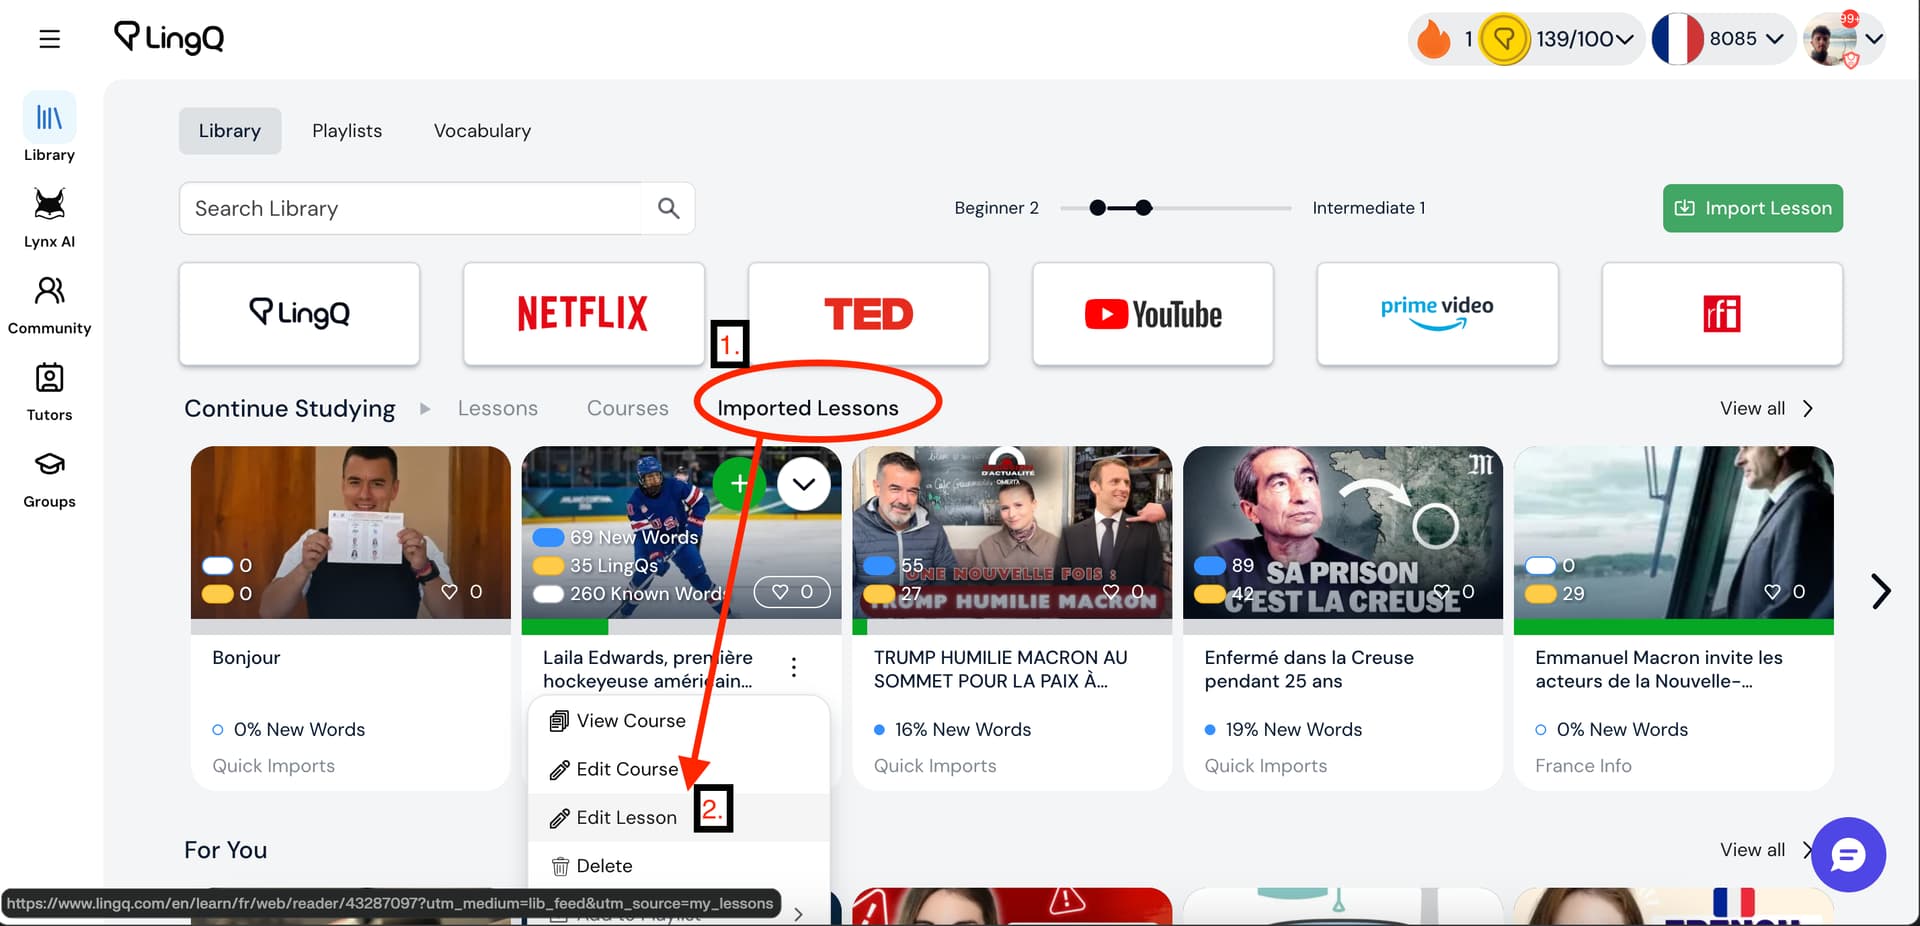
Library page showing the Imported Lessons tab and Edit Lesson on a tile.
Step 2: Edit lesson details (title, course, audio, video)
When the editor opens, it starts on the Lesson Details tab. This tab lets you manage the general information, course assignment and media for the lesson.
The Lesson Details tab contains:
- Title field: The lesson’s title (editable text input).
- Description field: A multi-line field where you can describe the lesson.
- Original URL: The source URL of the content, if applicable.
- Course: On the left side of the lesson details area, change which course this lesson belongs to.
- Audio (Add Files): The lesson audio file (for example, TTS or uploaded audio) with a playback bar and duration.
- Add Video: Option to attach a video to the lesson.
- Generate timestamps: Tool to generate or adjust timestamps based on the audio.
- Lesson Sharing: A sharing dropdown (for example, “Private”) controlling who can access the lesson. When you choose to share the lesson, additional options appear, such as tags, category and lesson level, which are only relevant to shared lessons.
Your course and lesson header (course name, new words percentage, audio length, and similar information) appears above, but the main editable elements are the fields and controls listed here.
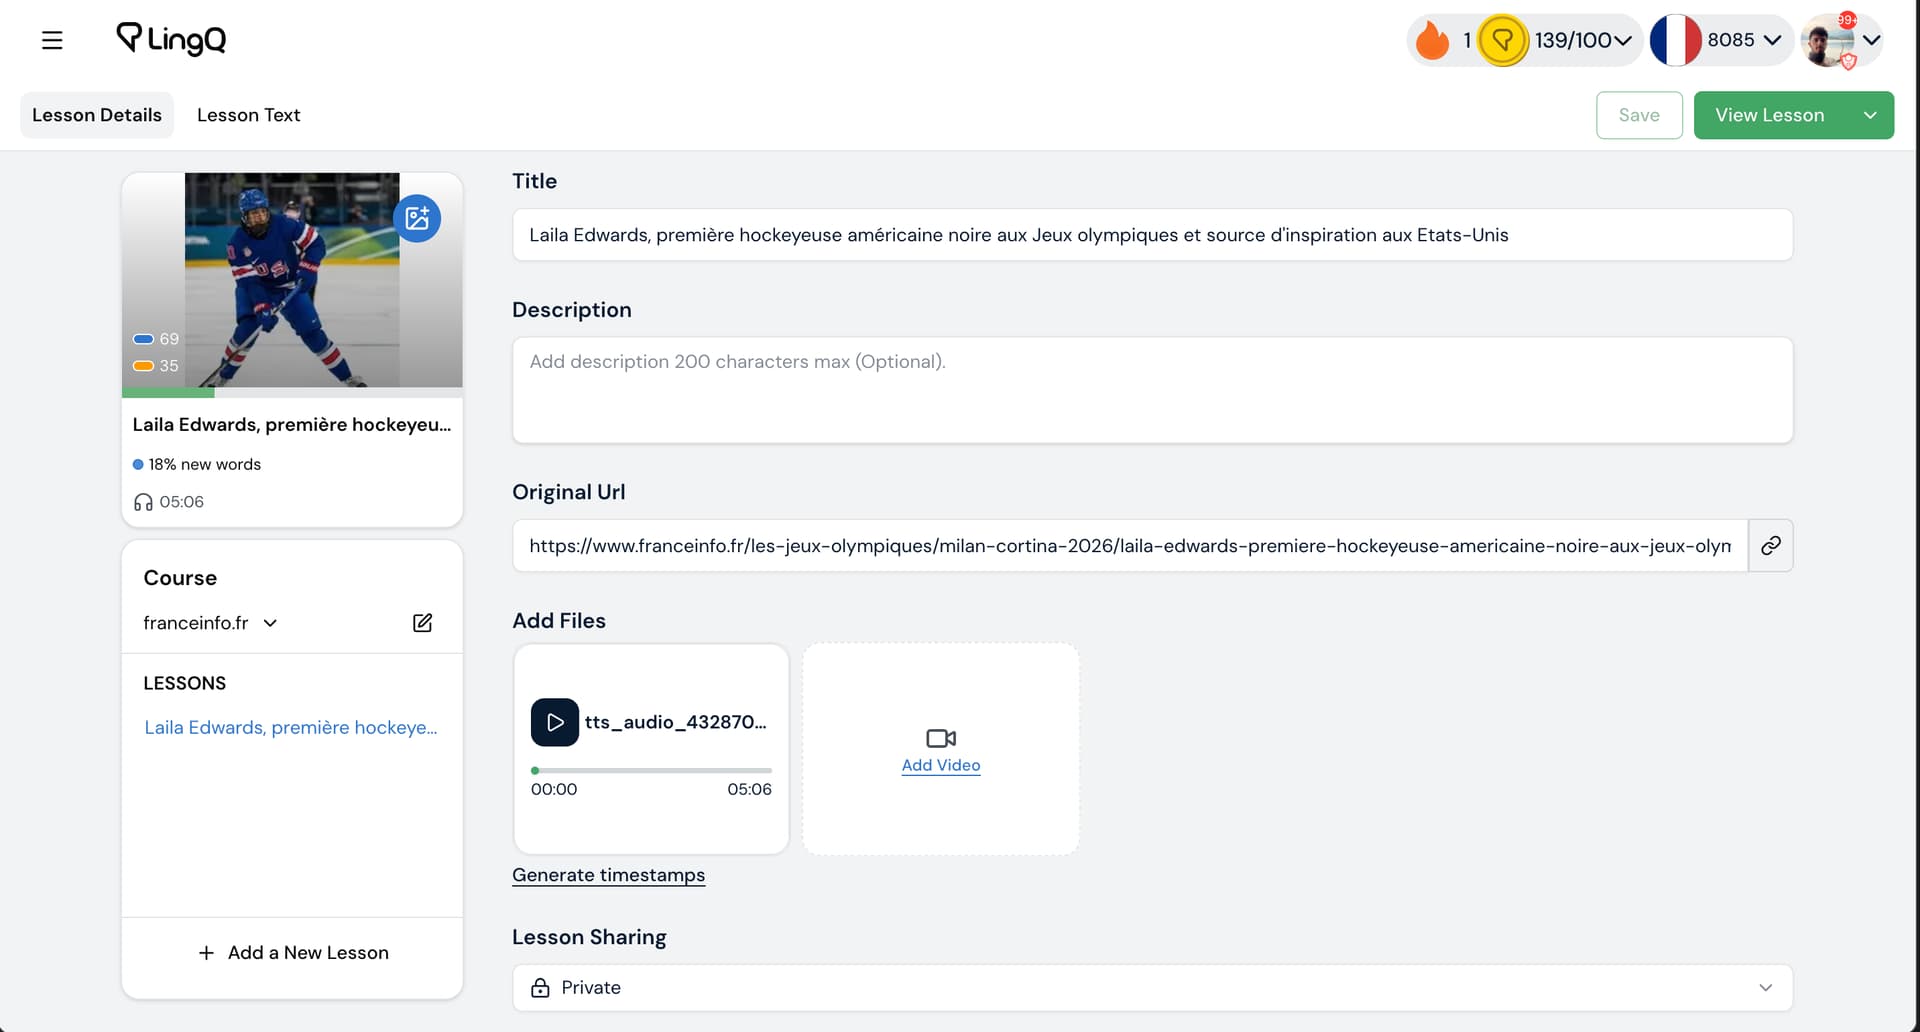
Lesson editor on the Lesson Details tab with all fields visible.
Step 3: Edit lesson text and sentences
To edit the actual content of the lesson, use the Lesson Text tab.
- In the editor header, click Lesson Text.
- You will see a large text editor with the full lesson text, with existing line breaks preserved.
- The lesson title remains visible at the top, and the Save and View Lesson controls stay in the header.

Lesson editor with the Lesson Text tab selected and the text visible.
Editing sentences and metadata
Within the Lesson Text tab, you can edit individual sentences and their metadata.
- Click directly on a sentence to edit the text inline.
- Open the sentence-level metadata (for example, audio or video alignment or segmentation settings, notes and translations) and adjust those properties. Sentence-level metadata is always available, even if there is no audio attached, so you can still edit notes and translations.
Use this to fix typos, improve formatting, or correct sentence splits.

Close-up of a sentence selected in the Lesson Text editor with metadata options visible.
Step 4: Regenerate a lesson (reset and new translations)
If you made mistakes during import or processing, you can reset a lesson and generate new translations.
- In the top-right of the lesson editor, open the three-dot dropdown menu.
- Click the Regenerate button to reset the lesson and generate new translations.
Step 5: Save and review your changes
After you make any change on either the Lesson Details or Lesson Text tab, a Save button appears in the top-right of the editor.
- Make your edits (title, description, course, text, audio or video, or metadata).
- When the Save button appears in the header, click Save to apply your changes.
- Click View Lesson to return to the reader and review the updated version.

Editor header showing the Save and View Lesson buttons.
FAQ
How do I edit an imported lesson in LingQ?
Open the language Library, click Imported Lessons, hover your lesson, click the three-dot menu, then Edit Lesson to open the lesson editor.
Why can’t I see Edit Lesson on some lessons?
The full Edit Lesson option only appears on your own imported lessons. For other Library lessons you may only be able to edit at the sentence level (for example, fixing a sentence or translation in the reader).
How do I fix paragraph breaks or sentence splits in a lesson?
Open the lesson editor, go to the Lesson Text tab, click on sentences to edit the text inline, and adjust paragraph breaks or sentence splits, then click Save.
How do I fix bad YouTube subtitles in an imported lesson?
- Open the imported lesson and click the three-dot menu → Edit Lesson to open the editor.
- Go to the Lesson Text tab.
- Edit sentences inline to correct the transcript and paragraph breaks.
- If needed, use Generate timestamps to realign audio and text.
- Click Save, then View Lesson to check the updated subtitles.
How do I change a lesson title and cover image for an imported lesson?
- Open the lesson editor (Library → Imported Lessons → three dots → Edit Lesson).
- On the Lesson Details tab, update the Title field.
- Change the course/cover image area as needed, using your course image controls.
- Click Save, then View Lesson to confirm the new title and cover.
Related articles
- How to import content into LingQ – overview of the 3 ways to turn content you love from around the web into LingQ lessons.
- How to Import Using the Browser Extension – import web pages, videos and subtitles that you can later refine in the lesson editor.
- Import Audio & Auto-Generate Transcript – create lesson transcripts from audio files that you can learn from instantly, or clean up in the lesson editor.
- How to import YouTube videos without captions – YouTube imports that may need manual text editing and timestamps.